CorelDRAW Version
![]() 1,425KB
1,425KB
PDF Version
![]() 239KB
239KB
Contents:
The camera
Taking photographs
Menus
Formatting disks
Deleting pictures
Exposure settings
Setting image size
LCD Display
Charging the camera
|
1 |
Shutter release Press 1/2 way and wait for the green dot to stop flashing then press all the way to take a photo. |
 |
| 2 |
Zoom Toggle left & right to zoom in and out. |
|
| 3 |
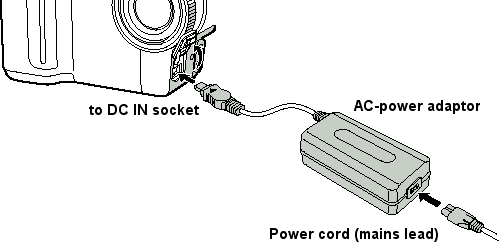
DC in Plug in AC Adapter to charge the battery or run the camera from the mains. |
|
| Contents |
Back
|
1 |
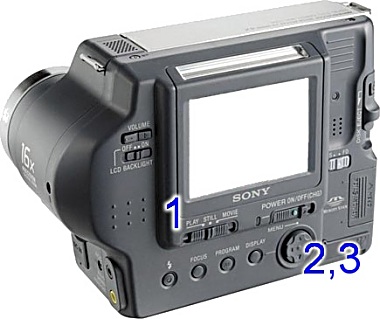
Function Switch Switch to STILL to take still photographs. Switch to PLAY to preview photographs & movies. MOVIE mode lets you record 15 seconds of MPEG audio & video on a floppy disk. |
 |
| 2 |
Power |
|
| 3 |
Disk eject |
|
|
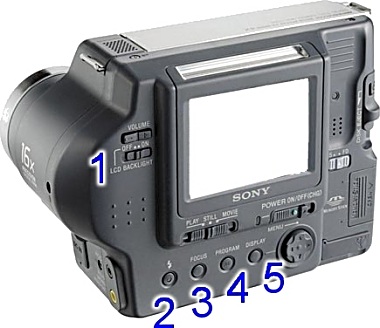
1 |
Backlight |
 |
|||||||||
| 2 |
Flash
|
||||||||||
| 3 |
Focus Pressing the FOCUS
button will take you through 6 focus settings: Automatic (no display)
, macro |
||||||||||
| 4 |
AE Program modes Pressing the PROGRAM
button with take you through 6 AE
modes: AE off (no display), twilight |
|
| 5 |
Display |
|
Taking photographs
| Theory:
The SONY Digital camera records between 6 and 40 photographs on a 3.5" floppy disk, depending on the size – in pixels – of the photographs taken. It can also record up to 15 seconds of video on a disk, when set to MOVIE mode. The camera can take images in sizes from 640 x 480 pixels to 1280 x 960 pixels in general an image size of 640 x 480 is adequate for web pages and PowerPoint presentations. Larger image sizes will provide better image quality for printing or allow for cropping. Before using the camera select check the image size and change if necessary see the LCD panel. |
|
1 |
Insert a disk |
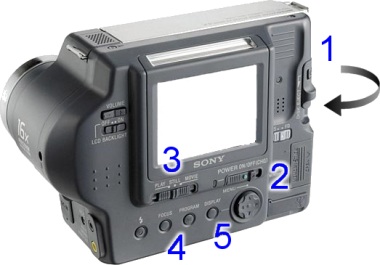 |
| 2 |
Power |
|
| 3 |
Function Switch |
|
| 4 |
Program modes |
|
| 5 |
Display |
|
|
6 |
Hold the camera at a comfortable distance and depress the shutter release button 1/2 way and watch for the green -AE- dot to stop flashing. This signals that the camera has adjusted the automatic exposure & focus. Press the shutter release fully you should see the word RECORDING appear on the LCD Screen |
| 7 |
To preview the photograph slide the function switch to PLAY return it to STILL to continue taking photographs. |
| Contents |
Menus
|
1 |
To display menus |
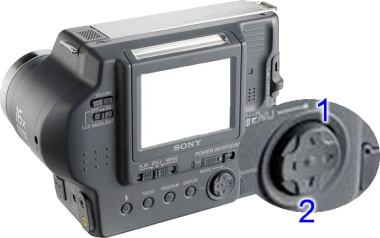 |
| 2 |
To
hide menus |
|
The selected item in any menu is highlighted yellow. Depressing the control
button exactly in the middle selects a
menu item. Make sure that you do not rock the control button when you attempt
to select a menu item.
Formatting disks
| Theory:
Formatting disks will erase all pictures and other files from a disk. |
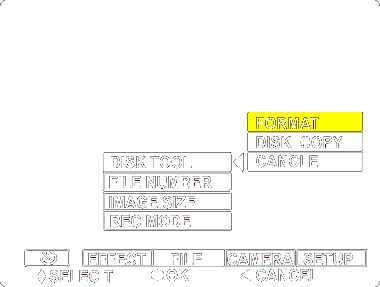
Select FILE | DISK TOOL | FORMAT | OK
Deleting pictures
Display the menu by rocking the control button upwards
Set the Function Switch to PLAY
select DELETE | OK from the menu
Exposure settings
| Theory:
In general the default exposure setting of 0 EV will be appropriate. If the last person to use the camera has set a positive EV number then your pictures may be overexposed, negative values will cause picture to be underexposed. |
|
1 |
Function Switch |
 |
||||||||||||||||||||
| 2 | Control Button Rock the control button upwards to display the menu. Select CAMERA | EXPOSURE |
|||||||||||||||||||||
| 3 |
Select desired exposure
setting |
|||||||||||||||||||||
|
||||||||||||||||||||||
Setting image size
|
1 |
Function Switch |
 |
||||||||||||||||||||
| 2 | Control Button Rock the control button upwards to display the menu Select FILE | IMAGE SIZE |
|||||||||||||||||||||
| 3 |
Select desired image size |
|||||||||||||||||||||
|
||||||||||||||||||||||
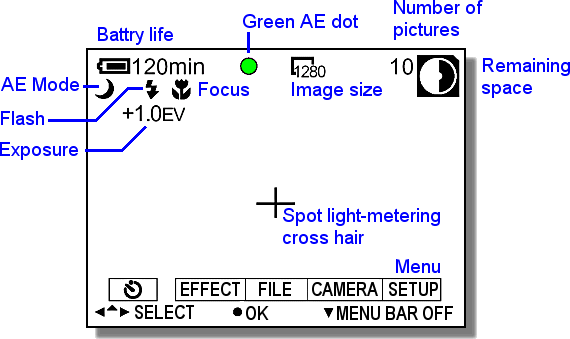
LCD Display
Charging the camera
Last modified: August 9, 2005
![]()
URL: http://www.rupert.id.au/tutorials/sony/index.html
APA Citation:
Russell, R. (2005, August 9). Sony Mavica digital camera notes. Retrieved
August 9, 2005, from
http://www.rupert.id.au/tutorials/sony/index.html